Working with appointments
Viewing appointments
Visual indicators
Each appointmentAppointmentA task scheduled to a resource for a specific period - the scheduled instance you see on the planning board. is rendered according to its own properties. Alongside the subject, a few visual indicatorsIndicatorCollective term for the visual signals - categories and time markers - that identify and label appointments. tell the planner more about the appointment at a glance.
The video below shows several of these indicators in action:
Category
Shown as the color of the appointment. The back-office application can drive this value, and you choose what each color means when you set up the application (for example order type, status, or truck load).
![]()
Time marker
Shown as the colored horizontal bar on the appointment. The back-office application can drive this value, and you choose what each color means when you set up the application (for example order type, status, or truck load).
![]()
Importance
Shown as the exclamation mark or arrow at the start of the appointment bar. The back-office application can drive this value, and you choose what it means when you set up the application (for example importance, priority, or urgency).
![]()
Notification
Shown as the colored vertical bar on the appointment. It signals that the appointment has notifications (coming from the back office) in the notifications component.
![]()
The color depends on the severity level of the notification:
- Red in case of errors
- Orange for warnings
- Blue for info messages
Each severity present is represented in the notification bar. This gives the planner an instant overview of which types of message exist for the selected record.
This ![]() has at least one error message. This
has at least one error message. This ![]() has at least one error message and one warning message. Finally, this
has at least one error message and one warning message. Finally, this ![]() has at least one error, one warning, and one informational message.
has at least one error, one warning, and one informational message.
Multi-assignment
When an appointment has more than one resource, this indicator marks it:

Linked appointment
The chain icon means the appointment was generated automatically by the Gantt chartGantt chartA timeline view for long-term project planning, showing tasks, durations, dependencies and milestones.. When a Gantt task has a resource assigned to it, Dime.Scheduler creates a planning for that task and resource, and any change to the task is then reflected in the planning board. The icon is a warning that changes you make to this appointment will be overwritten by the project's planning.
![]()
Tooltips
Different tooltips appear depending on what you are doing with the appointment:
-
When dragging the appointment across the planning board:

While you drag, the appointment validates whether the drop is allowed. For example, when the appointment is bound to a task with requested dates, or when a resource typeResource typeA logical grouping of resources, such as "excavator" or "consultant", used to organize and filter them on the planning board. only allows one of its resources to be assigned to an appointment.
When the drop is invalid, the tooltip changes:
 and the drop is rejected.
 -
When hovering over the appointment:

-
When hovering over an empty time slot:

Appointment details
Selecting an appointment on the planning board updates the details component with the appointment's information. This lets you scan its properties quickly without opening the editor. You can also show the same grid in a separate window with the Details item in the context menu.
Manipulating appointments
An appointment (or event) is the graphical representation of a task allocated to a resource on the planning board. You can interact with appointments in several ways, covered below.
| Capability | Description |
|---|---|
| Creating manual appointments | Create appointments manually in the planning board |
| Drag & drop open tasks | Plan tasks through drag and drop |
| Modifying appointments on the planning board | Modify the duration, dates and resources on the planning board directly |
| Modifying appointments via the editor | Update appointment details via the editor |
Creating manual appointments
In the default Dime.Scheduler flow, jobs and tasks come from the back-office applications, are converted into appointments in Dime.Scheduler, and are then sent back to the back-office applications. Planners sometimes need appointments that are not backed by a task or job. These are called manual appointments, and you can create them in two ways.
The first is through the context menu. Right-click an empty cell in the planning board and select the 'New' option to open the appointment editor. Enter a subject and the record can be created. The default duration depends on the view you are working in: a time slot equals one hour in the day view, and one day in the other views. Dime.Scheduler takes the start date you selected and adds one time slot to calculate the end time. You can change any of these values afterwards in the appointment editor.
The second is a drag create operation. Click and hold, then drag the mouse to the right. When you release, the appointment editor opens. As with the context menu, the resource and dates are filled in from the surrounding context. The only required field is the subject, which unlocks the save button.
The screen capture below shows both:
Modify appointments on the planning board
You can manipulate appointments by dragging and dropping the record on the planning board.
To change the duration, drag the appointment from either side using the handle at its edge:

When the duration is correct but the dates are not, drag the appointment to a different date:

The drop location does not have to be on the same resource. Drag the appointment to another resource to assign it there, and on drop the appointment is reassigned. Hold the SHIFT key at the start of the drag operation to switch the assignment planning mode from 'replace' to 'append'. In append mode, dropping the appointment on another resource adds that resource to the appointment's assignments, meaning the resources will perform the task together.

Keep in mind that this operation does not create a new appointment. It adds the resource to the assigned resources list, and the underlying appointment stays the same.
The appointment editor
The appointment editor (also called the appointment card) holds all the details of an appointment, split across several tabs. It is available only in the planning board component, and you can open it in the following ways:
-
For existing appointments:
- Using the context menu on an existing appointment and selecting the
Edititem - By double clicking on the appointment
- Using the context menu on an existing appointment and selecting the
-
For new appointments:
- Using the context menu on an empty slot and selecting the
Newitem - After creating a new (manual) appointment with the drag and drop feature
- Using the context menu on an empty slot and selecting the
The first tab, appointment details, groups the record's metadata. The second tab focuses on the resources for that appointment. All subsequent tabs are appointment templatesAppointment templateA set of extra fields added to the appointment card, scoped to source types, so planners can capture data beyond the defaults., which the administrator manages.
A combobox also reveals additional options for creating a recurring appointmentRecurring appointmentAn appointment that repeats on a schedule - weekly, monthly - that you manage as one series instead of re-creating it each time.. Read more about recurring appointments.
Appointment Details
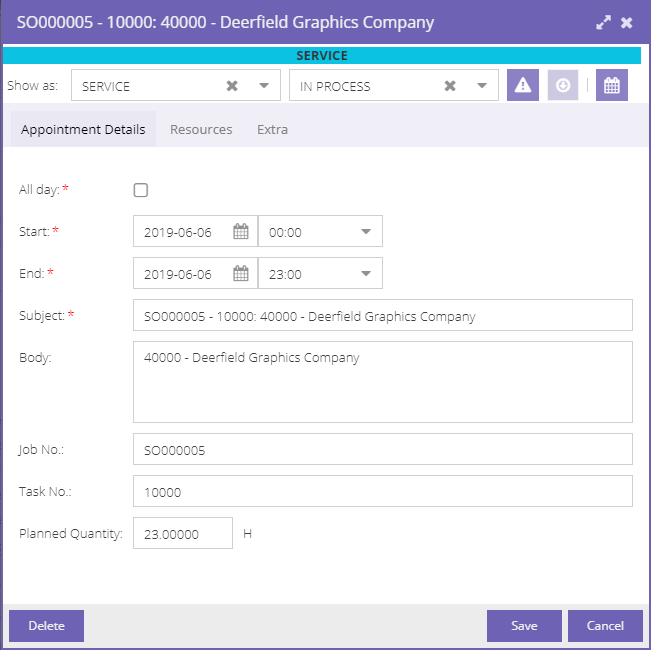
At the top you can modify the following fields:
- Category
- Time marker
- Importance
- Ignore calendars
The categories and time markers a user sees when opening the combobox depend on their permissions, since administrators can assign categories and time markers to users and user groups. There is also a visual aid above the editor's submenu, showing the category and its color across the appointment card.
The fourth item, the ignore calendars button, appears only when the administrator has switched on calendar mode.
In the appointment details tab you can change:
- Date and time
- The subject and body of the appointment
You can also view the job or task the appointment is linked to and check the capacity of the assigned resources.
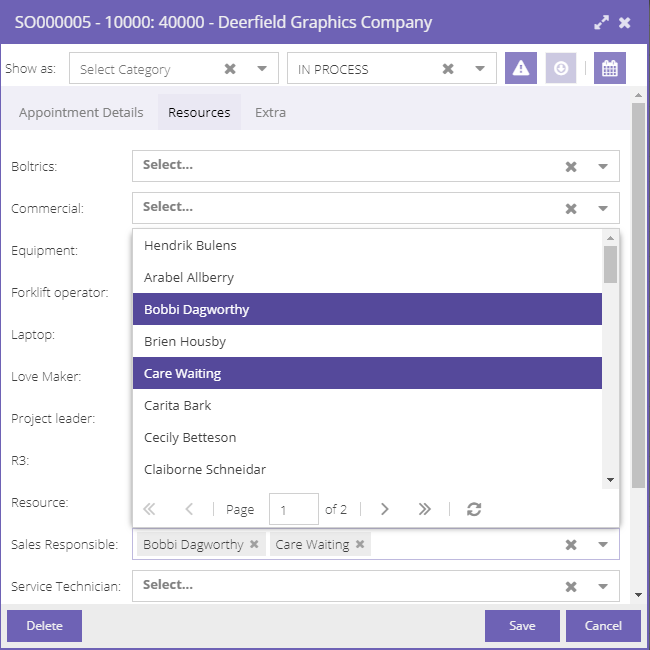
Resources
In the resources tab, select resources from the different resource types to link multiple resources to a single appointment. When it is allowed, that is configured in setup, you can select more than one resource from a resource type combobox.
Appointment Templates
As noted earlier, the appointment card may have additional custom tabs. These come from the setup of Dime.Scheduler and are specific to your organization. Check with one of the application managers to learn what each of those fields is for.
Drag and drop open tasks
The last way to manipulate appointments is through the open tasks grid. Drag a task from the grid and drop it on the planning board, and Dime.Scheduler converts the task into a scheduled appointment. This conversion brings a few additional features.
Data mapping
The conversion maps data: some fields from the task entity are copied to the appointment entity, and the appointment keeps a reference to the original task. A task is also re-evaluated every time a planned task is created, updated, or deleted. This evaluation determines whether the task is still 'open'.
Properties such as importance and planning quantity are copied to the appointment. The task entity also has a 'Subject' and 'Body' field (not shown in the open tasks grid) that are populated using field templates. These templates use placeholders that are replaced with data from the task and its underlying job.
Requested dates
Tasks can carry requested dates, which only take effect when the global configuration enables this mode. Requested dates enforce the start and end date of a planned task. When the configuration is enabled and a task has a "requested start date" and/or "requested end date", the planner is overruled. If the requested dates are open-ended (no end date), the original duration, also specified on the task, is applied.
These rules do not apply to manual appointments, which makes sense given there is no task to enforce them.
Requested times
Requested times work almost the same as requested dates, with a slightly narrower scope. Instead of setting the date and time, this feature sets only the times of the appointment. Like requested dates, it must be activated in the global configuration.
When both requested dates and times are activated and a task has both sets of data, the 'Requested date' fields are used instead of the times.
Enforce date window constraint
Beyond the automatic date and time assignment in the open tasks list, the same validation rules can apply on the planning board. When the configuration is set and a task specifies 'earliest allowed' and 'latest allowed' dates, the planner has freedom within that frame.
When you plan outside the time window, the tooltip warns you, and dropping outside the window is rejected. This adds an extra layer of validation. Imagine how you would feel if your planner dispatched you, a proud owner of a hot dog cart, to the Yankee stadium only to find the game finished three hours ago.
![]()
These boundaries are enforced even when tasks specify requested dates. That can be a problem, because it can spiral the task into a deadlock, so check the data before sending it to Dime.Scheduler.
These rules do not apply to manual appointments, which makes sense given there is no task to enforce them.