Context menu
Right click an appointmentAppointmentA task scheduled to a resource for a specific period - the scheduled instance you see on the planning board. or an empty slot on the planning boardPlanning boardThe main graphical scheduling surface where dispatchers drag tasks onto resources across a timeline. to open the context menu, which gives the planner quick shortcuts for working with appointments. Two factors determine which functions a user sees:
- Security clearance
- Whether the click lands on an existing appointment or an empty slot
The full list of menu items is described in the table below:
| Function | Description | Protected by user action | Context |
|---|---|---|---|
| Go to today | Navigates the planning board to the current day | N/A | All |
| Open in day view | Changes the view to the day view and scrolls to the selected cell | N/A | All |
| Details | Opens a window with the appointment details | Appointment | |
| New | Creates a new appointment, uses the selected slot as the start date and the profile's range to determine the duration | New | Planning Board |
| Edit | Updates the selected appointment | Edit | Appointment |
| Delete | Removes the selected appointment | Delete | Appointment |
| Cut | Cuts the selected appointment | Cut | Appointment |
| Copy | Copies the selected appointment | Copy | Appointment |
| Paste | Pastes the selected appointment on the selected time slot on the planning board | Paste | Appointment |
| Special paste | Opens a sub menu with special paste options | Paste | Appointment |
| Toggle calendar mode | Toggles the calendar mode of the selected appointment | Bypass calendar | Appointment |
| Quick actions | Quick actions to postpone or expedite appointments by a day, week, or month | Edit | Appointment |
| Split appointment | Cuts an appointment in two separate appointments | Split | Appointment |
| Disconnect assignment | Either removes an assignment or creates a new appointment for the selected assignment | Split | Appointment |
| Links | Opens a sub menu with links | N/A | All |
| Action URI's | Populates the underlying URI's placeholders and executes the URI | Action URL | All |
A second context menu lives in the resource grid of the planning board. Right click a cell in the resource grid to open it. The options are limited to the resource URIs for the resource in the menu's context. Unlike action URIsAction URIA dynamic link, populated with fields from a task, job or appointment, that opens an external system in one click., resource URIs don't contain placeholders, so they are static links to locations relevant to that resource, such as a link to the resource card in the back-office system.
Copy and paste
Dime.Scheduler offers a set of copy and paste features that work the way you would expect.
They are not limited to a single planning board: you can copy and paste appointments across pages and across planning boards. Copying and pasting multiple appointments is also supported. The interval between the appointments in the selected range stays intact, while the date and resource are set according to the current mouse position.

Cut & copy paste
Cutting an appointment removes the original record and replaces it with the pasted appointment in the selected time slot. A cut appointment is shown shaded until you paste it.
![]()
When you copy instead, a new appointment is created and the original stays in place. You can reach both features two ways: through the shortcut keys and through the context menu.
Special paste
There are three special paste actions:
- Paste but maintain the same resources
- Paste but maintain the time
- Paste but maintain date and time
The first action respects the selected date and time but pastes the appointment on the resource that was assigned to the cut or copied appointment. The other two invert this logic: they apply the selected resource but not necessarily the selected date and/or time slot.
Copy/Paste shortcut keys
Here is an overview of the keyboard shortcuts for the copy and paste features in the planning board:
| Function | Shortcut key |
|---|---|
| Cut | CTRL + X |
| Copy | CTRL + C |
| Paste | CTRL + V |
| Special paste: maintain resources | SHIFT + R |
| Special paste: maintain time | SHIFT + T |
| Special paste: maintain date and time | SHIFT + D |
Split appointments
Appointments can be split in three different ways:
- Keep the appointment but remove the selected assignmentAssignmentThe link between an appointment and a resource. An appointment can carry several assignments when more than one resource works on it.
- Create a separate appointment for the selected assignment
- Split the appointment in two
These actions are available through the context menu or via shortcut keys:
| Function | Shortcut key |
|---|---|
| Remove assignment | SHIFT + 1 |
| Disconnect assignment | SHIFT + 2 |
| Split appointment | SHIFT + 3 |
A split does not necessarily produce two even parts. As with the copy and paste functions, the cut-off point is the mouse position at the moment you open the context menu or enter the keyboard combination. Keep in mind that the snap interval setting may adjust the final value. For example, with a snap interval of 1 hour, splitting an appointment at 10:15 is adjusted to 10:00.
The end dates of the appointments do not change when calendar mode is switched on. The total working time stays the same, divided across two separate appointments.
Drag and drop validation
How freely an appointment can be dragged and dropped on the planning board depends on the application settings, the user's security level, and the specifications of the resources, resource types, tasks, and appointments. The sections below explain each validation rule:
- Appointments must not be locked
- Linked (Gantt) appointments must not exceed the task boundaries
- Appointments must stay inside the boundaries of the allowed dates
- Appointments must take the resource type 'allow multiple selection' setting into account
Locked
A locked appointment cannot be manipulated. The lock is usually set in the back-office system; it cannot be set inside Dime.Scheduler itself. You can recognize locked appointments by their shaded stripes.
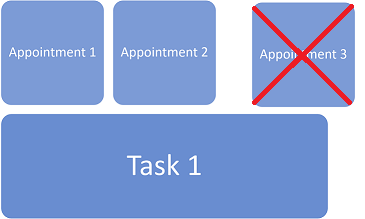
Linked appointments
Linked appointments come from the integration with the Gantt chart. When a resource is assigned to a task and the Gantt chart is synchronized, appointments are created in the planning board.
You can usually modify these appointments freely, with one caveat: a linked appointment cannot exceed the dates of the underlying task. The sketch below shows the boundaries. An appointment may occur anywhere at any time as long as it stays inside the date boundaries (the start and end date of the task).

Dragging an appointment outside the boundary will not pass the test:
Open task constraints
The application configuration contains a setting called "Apply allowed date constraints". When this setting is activated, the planning board applies an extra validation rule.
It is very similar to the previous rule and is the same rule as the date window constraint. When a task specifies "latest allowed" and "earliest allowed", appointments can only be planned inside that time frame.
Resource type
Moving an appointment to another resource, or adding an assignment with SHIFT + drag, brings in one more validation rule. Every resource belongs to a resource type, and a resource type has a property called "allow multiple selection". When this switch is on, you can assign more than one resource of that type to an appointment. When it is off and a planner tries to add a second resource of that type to an appointment, validation fails and the change is not stored.
State
This component is stateful. The following elements are stored:
- View
- Columns with order, sorting and filters
- Page size
- Appointment height
- Ignore calendars mode
Standard view settings
You specify the planning boards' standard view settings via the settings cogwheel in the profile area. These settings are stored in the user profile and are used when the application launches, when you open a profile and when you add a planning board to the profile.
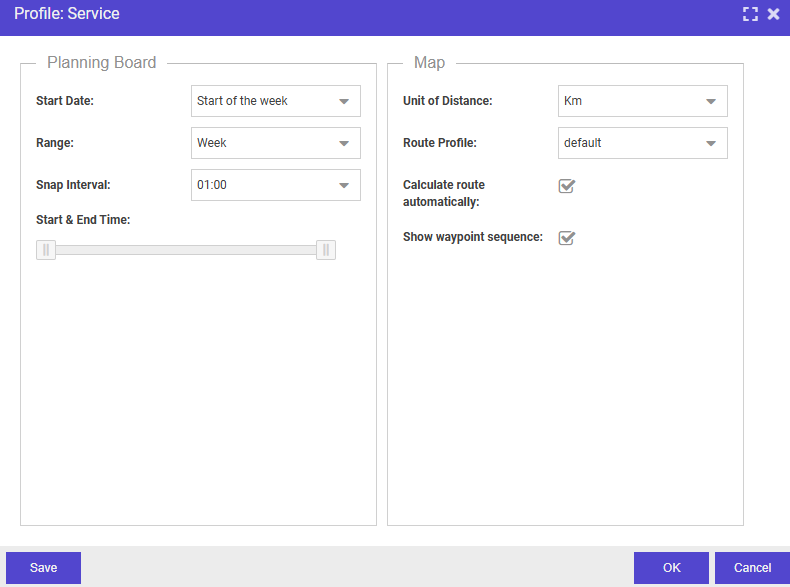
These settings overlap with the start date and range of the planning board component. You can select the same values here, including a custom value. The start date field accepts a positive or negative value relative to the current day (for example, -1 to show the planning from yesterday when the application starts). The range field accepts positive values only. The menus in the planning board do the same thing, except that they are stateless, unlike their counterparts in the profile area.
The snap interval defines the minimum increment by which you move appointments on the planning board, whether you move the whole appointment or just its start and end time. It makes drag and drop easier and keeps your planning consistent.
By default Dime.Scheduler shows all 24 hours on the planning board. Use the sliders to set the start and end time.
These settings apply immediately to all planning boards in the profile, but the profile itself is not updated automatically. Save the profile explicitly to persist the changes.
Containers
ContainersContainerA grouping mechanism that bundles related tasks or appointments so planners can move and manage them together. let you group appointments and plan the group as a whole. A dedicated article walks you through the feature.
Links
Contextual links are available in the links table. Standard connectorsConnectorAn integration that links Dime.Scheduler to a back-office system, routing data in and scheduling decisions back out. like the one for BC automatically generate items that link back to the original record in Business Central. As with everything else in Dime.Scheduler, you can add your own links too, for example to SharePoint documents or intranet pages.
Select an appointment, and hit 'L' on your keyboard to open the contextual links for the appointment and its associated task and job.