Jobs
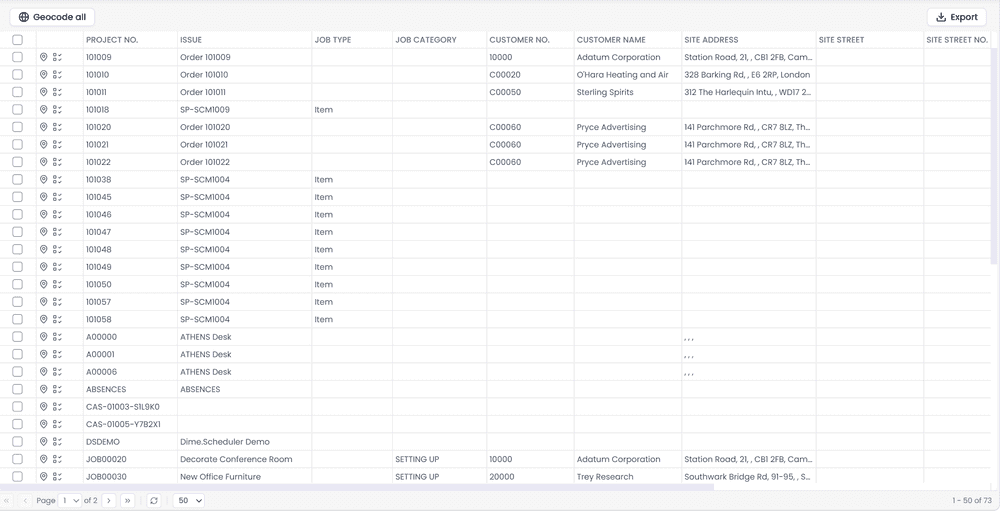
A jobJobA high-level container, comparable to a project, that bundles related tasks together with common information such as customer, billing, and address. is the unit of work that everything else hangs off: every taskTaskA unit of work that belongs to a job. It appears in the open task list until it is scheduled to a resource., every appointmentAppointmentA task scheduled to a resource for a specific period - the scheduled instance you see on the planning board. traces back to one. This page is the complete list of jobs in the tenant, and it is where an administrator goes when a planner reports an address that will not geocode, a stale order that nobody planned, a duplicate that no longer exists in the source system, or a project that needs to exist before the back officeBack officeThe ERP or business system Dime.Scheduler plans for - most often Microsoft Dynamics 365 Business Central. It owns the master data and remains authoritative over what it receives. knows about it.
Where jobs come from
In most setups jobs flow in from a back office such as Business Central, and the back office stays the master: it creates them, updates them, and closes them. On those tenants an administrator rarely touches this page beyond geocoding and the occasional cleanup, and a job created by hand here would be an orphan that the next sync does not know about.
The other case is project planning without a back office. When Dime.Scheduler is the system of record, a projectProjectA job seen as a whole in project planning: a body of work with a budget, a team, dependencies and a deadline. Its tasks are still planned as ordinary appointments on the board. has to start somewhere, and this is one of the places it can. The New project button opens the same project editor the project planning pages use, with tabs for the general details, addresses, options and custom fields. Leave the project number empty and one is generated. Every job you see here is a project on the user side, so the two views are interchangeable: a job created here appears in the projects list, and a project created there appears in this grid. Which one you use is a matter of role. Planners work from the project pages; administrators tend to land here because this is also where geocoding and cleanup live.
The rule of thumb: if a back office owns your jobs, let it own them. If nothing upstream does, creating them by hand is the normal path, not a workaround.
Existing jobs can be edited from the pencil icon on each row or by double-clicking the row. The same editor opens, so a job that came from the back office can be corrected here too; be aware that the next sync may overwrite what you changed.
Geocoding addresses
A job without coordinates cannot show up on the map, and planners working with map-based dispatching depend on every relevant job being plotted. There are two ways to trigger geocodingGeocodingConverting an address into map coordinates so a job or resource can be placed on the map and used for routing.:
- The Geocode All toolbar button runs across every job that does not yet have coordinates. It is the same routine that runs nightly to pick up new arrivals, so use it when you want results faster than waiting for the next nightly pass.
- Each row has a small geocode button that geocodes just that job. Reach for it when an individual job's address changed and you don't want to wait.
For the routine to produce sensible results, the address needs to be unambiguous. "Papa John's Pizza, Rome" could be the Italian capital or a small city in Floyd County, Georgia - the algorithm picks one and you may not like which. Use international conventions like ISO 3166 country codes; the localization view maps localized country names to their ISO equivalents to make this easier. Read more about geocoding.
Finding the job you are after
The grid shows a handful of columns by default (job number, name, description, type, category, customer, site address and coordinates) and hides the rest: contacts, billing, the "from" site, free fieldsFree fieldOne of the unmapped fields on jobs, tasks and appointments that a back office can fill with its own data, each with a localizable caption. and so on. Any column can be switched on from the column header menu, and every visible column can be sorted. Most text columns also carry a filter, and the grid can be grouped by a column, which is the quickest way to answer questions like "which jobs have no category" or "how many jobs per customer".
Export writes the current grid, with the columns you have visible and the filters you have applied, to an Excel file. It is the easiest way to hand a list of jobs to someone who does not have access to Dime.Scheduler.
Inspecting and editing a job's tasks
The tasks icon on a row opens a side panel listing every open taskOpen taskA task that has not been scheduled yet. It waits in the open task list to be placed on the planning board. linked to that job. The panel is a working surface, not just a view:
- New task creates a task on this job. The editor is the same one the project pages use, and tasks already on the job are offered as possible parents, so you can build a small breakdown without leaving the panel. Leave the task number empty and one is generated.
- The pencil icon, or a double-click, edits a task.
- The filter icon opens the task's Filter Values sheet, where you tick the filter valuesFilter valueA single value inside a filter group, used as a qualification on a resource or a requirement on a task. that apply to that task. Values are grouped by filter groupFilter groupA configurable set of fields used to filter resources and tasks on the planning board.; you can toggle a single value, a whole group, or everything at once. Each change saves immediately. This matters because filter values are what the planning boardPlanning boardThe main graphical scheduling surface where dispatchers drag tasks onto resources across a timeline. filters on, so a task with the wrong values is invisible to the planner who should see it.
- Delete removes the selected tasks, covered below.
Cleaning up jobs and tasks
Stale jobs and tasks accumulate: a back-office system imported an order that was later cancelled, a connectorConnectorAn integration that links Dime.Scheduler to a back-office system, routing data in and scheduling decisions back out. pushed duplicates during a migration, a customer reported the wrong job number. This page lets administrators delete them directly, without having to go back to the source system.
Deleting jobs
- Select one or more jobs in the grid using the checkboxes.
- Click Delete in the toolbar, which shows how many jobs are selected, or press the Delete key while the grid has focus.
- In the confirmation dialog, optionally tick Also delete linked appointments to cascade the delete to every appointment backed by the selected jobs.
- Confirm.
With the cascade option on, appointments are removed in the background and a notification fires when the cleanup is done.
Deleting tasks
Tasks are deleted from the per-job side panel:
- Open the job's tasks side panel.
- Select one or more tasks.
- Click Delete and confirm. The same Also delete linked appointments option applies.
Deleting jobs or tasks is permanent within Dime.Scheduler - the records are gone. If the data originated in a back-office system, however, the next sync may re-import it. For jobs that should stay gone, delete them at the source too.
Who can do what
Creating and editing jobs and tasks requires the Manage projects user actionUser actionA single protected capability, such as 'edit appointment', that a role can grant. The building block of role-based access control., the same one that gates the project pages. Deleting jobs and tasks is reserved for global administrators. Users without the relevant right simply do not see the corresponding buttons; the geocoding and export functions are available to everyone who can open the page. See roles and user actions.