Appointment Templates
The standard appointment card in Dime.Scheduler has the obvious fields - start, end, resource, description - and that is enough for a lot of scheduling work. It is not enough the moment a customer needs the technician to record a serial number, a meter reading, a "did the customer sign off" checkbox. Appointment templatesAppointment templateA set of extra fields added to the appointment card, scoped to source types, so planners can capture data beyond the defaults. are how you add those fields without writing code.
A template adds custom tabs and fields to the appointment card; whatever the user fills in flows back to the back-office application alongside the standard appointment data. You can define multiple templates and bind each one to a different kind of taskTaskA unit of work that belongs to a job. It appears in the open task list until it is scheduled to a resource., so the card adapts to the work at hand instead of becoming a wall of irrelevant fields.
How templates, sections, and fields fit together
The model has three layers:
- A field is the smallest unit - a name, a data type, a default value. Fields live in their own grid and can be reused.
- A section groups fields into a single tab on the appointment card.
- A template groups sections, and is what gets assigned to a task type.
The same field can appear in more than one section, and the same section can appear in more than one template - that reuse is what keeps your data model consistent across the business.
.
+-- Appointment Template 1
|   +-- Section 1
|        +-- Text field 1
|        +-- Number field 1
|   +-- Section 2
|        +-- Text field 2
|        +-- Date field 1
|        +-- Yes/No field 1
+-- Appointment Template 2
|   +-- Section 3
|        +-- Text field 1
|        +-- Yes/No field 1
|   +-- Section 4
|        +-- Text field 3
|        +-- Date & time field 1
Building a template from scratch
The whole setup happens on a single page (Settings → Appointment Templates) with six grids that mirror the three-layer model:
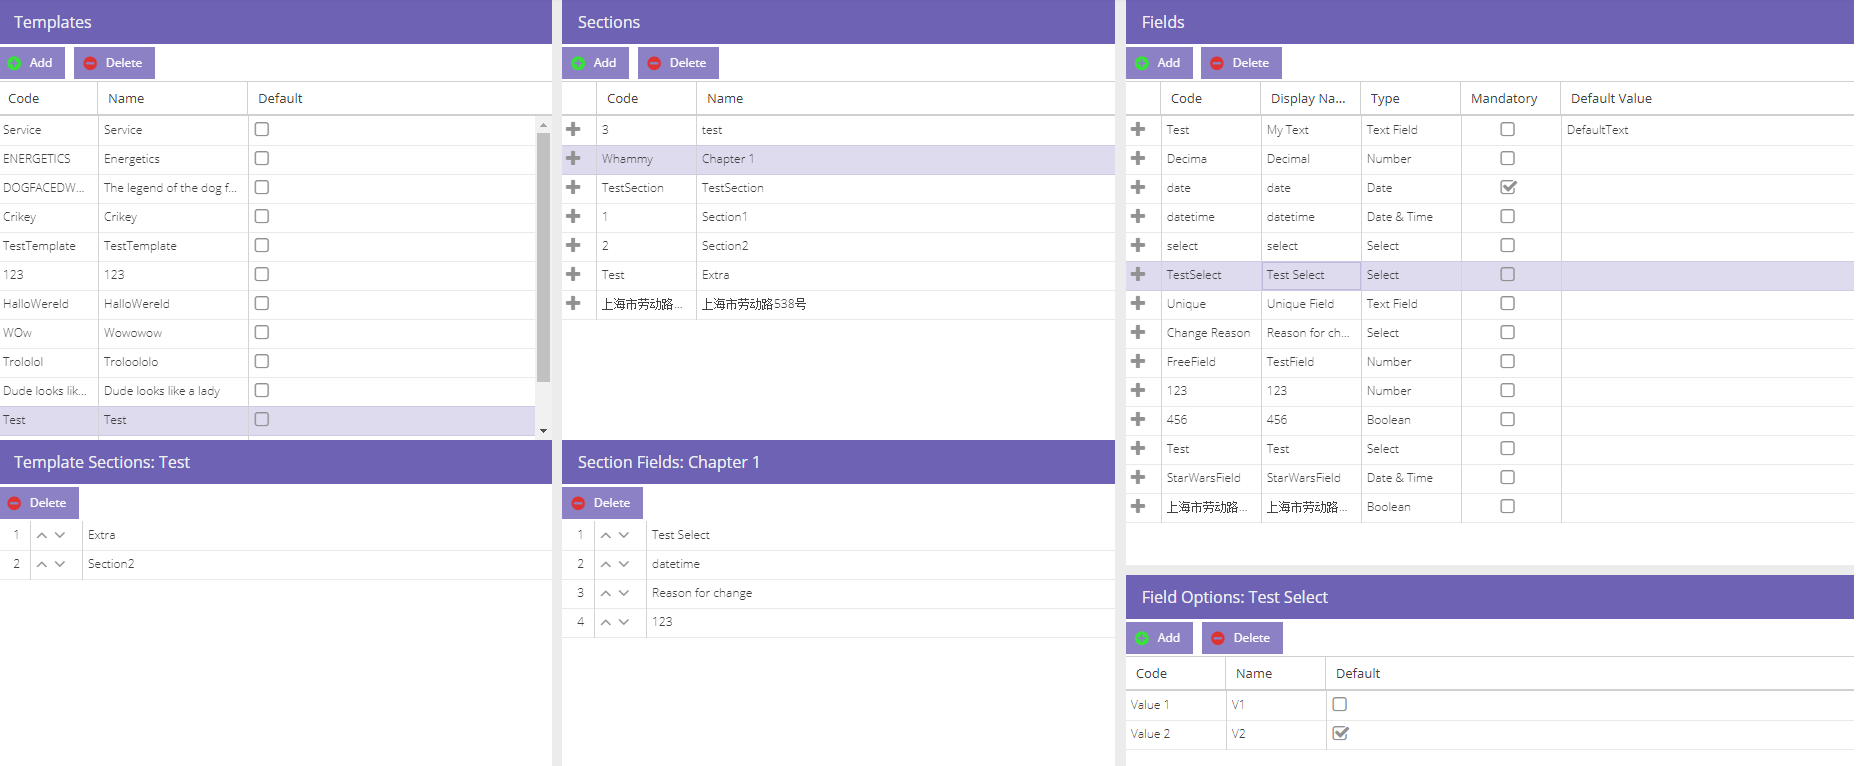
- The top three grids define the entities themselves: templates, sections, fields.
- The fourth grid (below fields) is for the options list of
Selectfields. - The two assignment grids are contextual to whatever you have selected: they show which fields belong to the selected section, and which sections belong to the selected template.
The workflow is bottom-up: define the fields first, group them into sections, then assemble sections into templates.
Defining fields
The fields grid is where you create the actual data points the user will fill in.
| Field | Description |
|---|---|
| Code | The name with which the field is stored. This code is also sent to the back-office application as the identifier of the field. |
| Display Name | The label or caption of the field on the appointment card |
| Type | Specify the type of data the user should enter in the field. The options are:
|
| Mandatory | Specify whether this field is required. If a field has a default value, then this requirement will automatically be fulfilled. |
| Default | Enter the default value for the field. The user can always modify this value afterwards in the appointment card. |
For Select fields, the options grid below the fields grid is where you list what the user can pick from:
| Field | Description |
|---|---|
| Code | The code with which the option is stored in the database and which is also sent to the back-office application. |
| Name | The label or caption of the option shown to the user |
| Default | You can specify one of the options to be the default value for the Field. |
Defining sections and templates
Sections and templates have nearly identical fields - both just need a code and a name. The template grid has one extra column:
| Field | Description |
|---|---|
| Code | The identifier of the template. This code is used - by the back-office application - to define which template to use for a task. |
| Name | The name is only used for managing templates and allows you to give a more elaborate description than with the code. |
| Default | If a task is sent by the back-office application without a template code, then the template marked as default is automatically applied for that task. That is of course only when one of the templates is marked as default. If a task is sent by the back-office application with a template code then that template is applied and the default is overridden. |
Wiring fields into sections, sections into templates
The two assignment grids work the same way on both layers:
- Select the parent (a section, or a template) on the left.
- Click the + icon next to the child you want to add (a field, or a section). The child appears in the assignment grid on the right.
- Reorder with the up/down arrows on the assignment grid; the order is what the user sees on the card.
- Remove with the Delete button on the assignment grid (this unlinks the child, it does not delete the field or section itself).