Look & Feel
Get to know the Dime.Scheduler interface so you can find your way around and explain it to a customer. This page walks through the structure of the screen and how the main pieces fit together.
The image below shows the main view:
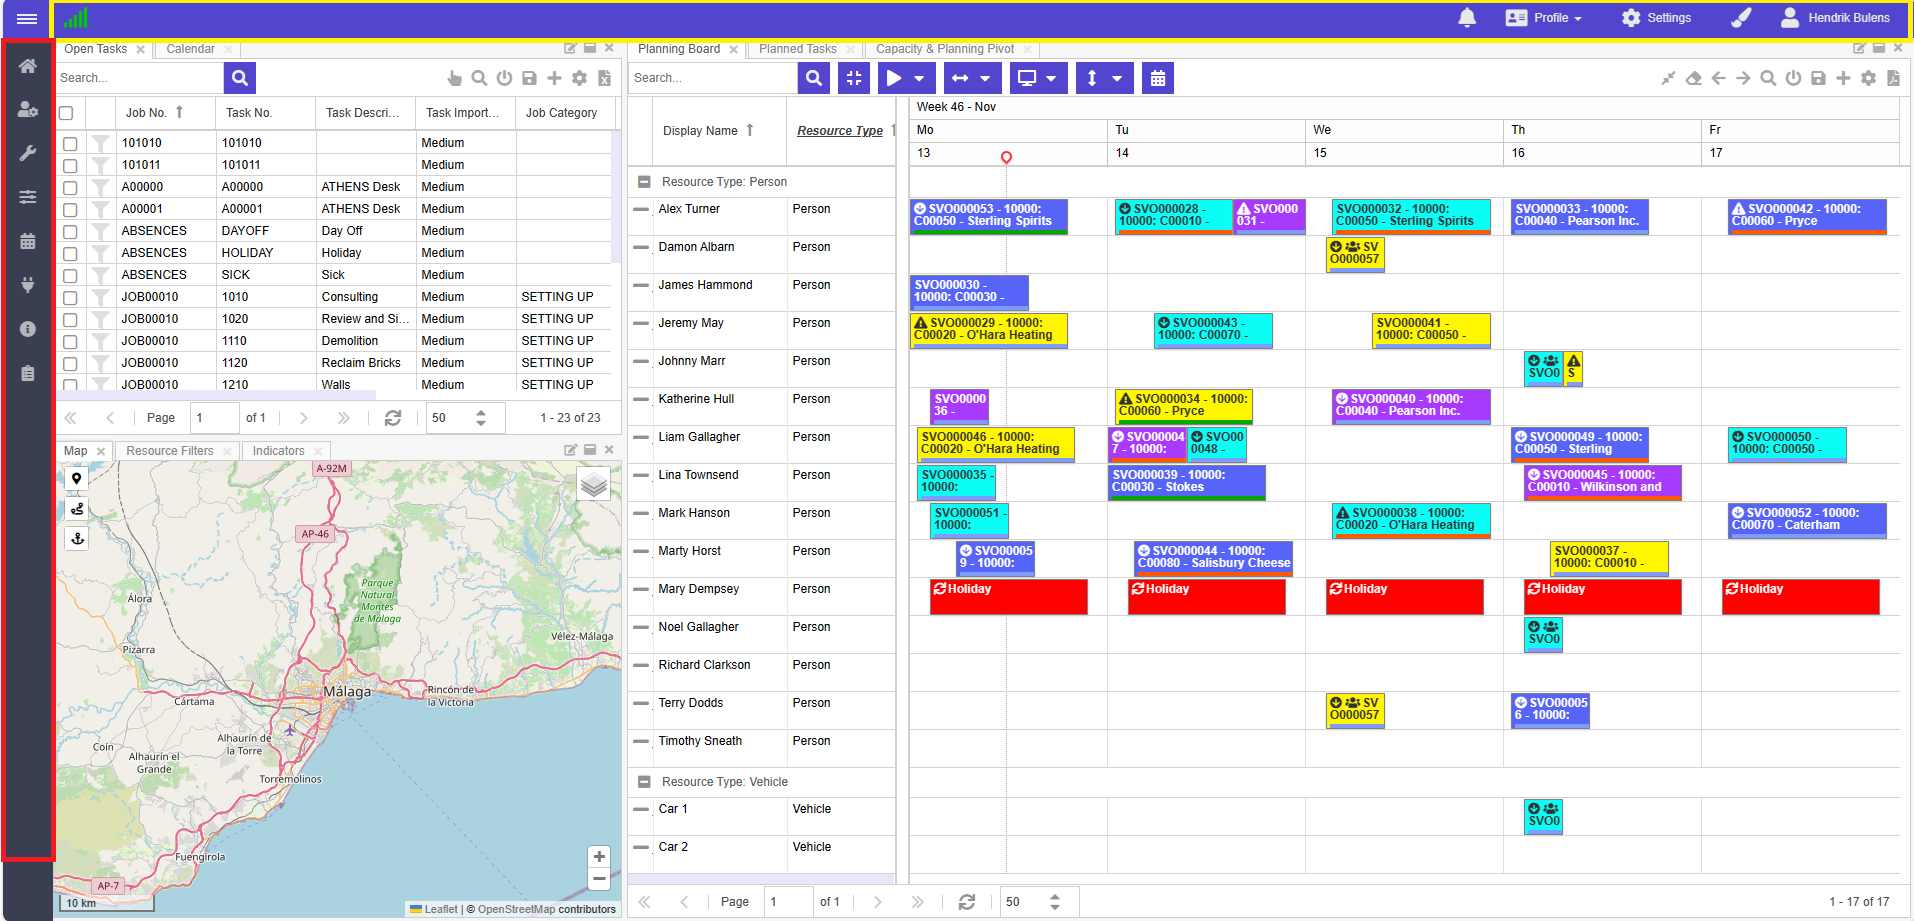
The view has three parts:
- Side and top navigation menu
- Application window
- Profile area
Navigation
Main menu
The side navigation menu guides users through the modules of the application. It also shows the name of the current user and the active user profileProfileA saved snapshot of a user’s planning board configuration, including the chosen layout and view options.. The menu is secured by user rolesUser roleA named bundle of user actions assigned to users and user groups. Permissions flow through roles, never directly to a user., so what a user sees may vary depending on their permissions.
The menu has the following items:
- Planning: takes you to the application view with your planning boardPlanning boardThe main graphical scheduling surface where dispatchers drag tasks onto resources across a timeline.(s). This is the default view that is shown when Dime.Scheduler is launched.
- Administration: contains references to user management.
- Application setup with general settings and configuration
- Settings: has submenu items to manage master data such as resources, field templatesField templateA rule that composes an appointment subject and body from job and task fields, so the text reads the way planners want., pane layouts and calendars.
- Exchange settings.
- Agenda has submenu items to show the planning in a read-only mode
- Info: about the license and the tenant
- Transactions: list of modifications to the planning
Toggle the menu button to collapse and expand the side navigation menu. When the menu is collapsed, hover over an item to make its submenu pop out automatically.
At the very bottom of the side navigation menu, two shortcuts let you toggle Dime.Scheduler into full screen mode and log off from the application.
Links
Just below the side navigation menu sits a section reserved for links. The application manager manages these in the corresponding setup view.
Application window
This is the canvas where planners do their work.

It is the heart of Dime.Scheduler, holding every component and action you need for scheduling: planning boards, open tasksOpen taskA task that has not been scheduled yet. It waits in the open task list to be placed on the planning board., planned tasksPlanned taskAn appointment together with the resources assigned to it - the full picture of what will be done, by whom, and when., filtering, map, and more. The rest of this manual covers working in the planning view in detail.
The profile area
A user profile is a key concept that this manual covers in depth. In short, a profile captures the state of the planning canvas (which components are loaded, their height and width, which layout is the default, and so on) and makes it reusable across sessions and users.
You manage the profile mainly through the top bar's profile menu item:
![]()
The sections below explain each part and how it works.
Profile
Manage profiles here. Users can create and update profiles, load profiles on the fly and change the default profile. They can also add new components to the canvas or to existing planning boards that they are allowed to use.
Event notifications
Receive general system notifications here. When you have new notifications, the icon shows the count.
Account
Lets you log off.
Styling
Configure the theme and colors here. These settings are stored as part of the user profile.

The selected theme or color applies immediately, but like the other settings in the profile, it is not saved automatically. To keep the changes, store the profile explicitly.
Profile settings
The cogwheel icon shows and hides a set of buttons and switches that configure the profile. Later parts of the user manual explain each of these settings in detail.
This slide-in pane has three sections:
- General settings like time zone
- Scheduler settings like start date and date span
- Map settings such as the unit of distance and route profile
Status icons
The left-hand side of the top bar has space for four icons: .
Connection
The connection icon shows the connectivity status between the browser and server. An orange or red icon signals a problem with the connection, which means real-time updates may not arrive during the session. This does not necessarily mean the server is down; it just means tasks and appointments may not update automatically. Refreshing the components usually still works. If it does not, there is a bigger issue at hand.
The browser and server automatically try to re-establish the connection. When that fails, a page refresh usually solves the problem.
Zoom level
Some features, such as drag and drop and rendering resources and appointments on the planning board, rely heavily on coordinates. Users may see degraded performance or incorrect behavior when the browser zoom level is not 100%. The device pixel ratio is a close approximation of the browser zoom level and the scale settings of the user's monitor; it tells us how many of the screen's actual pixels are used to draw a single CSS pixel. When the ratio is not 1, the icon appears in the top bar. This does not change any behavior; it simply informs the user.
Default profile
Most state-related features are only available when there is an active (or default) profile. The first time you launch Dime.Scheduler, you typically start with the standard profile that Dime Software provides, and you cannot store layouts until you save a profile. The icon in the top bar reminds you of this. As soon as you save a profile and work within its context, the icon disappears and the state features become available.
Query string parameters
Query string parameters let you change how the application behaves. The following parameters are supported:
| Name | Type | Comment |
|---|---|---|
skipProfile | Boolean | Set to true to skip loading the default profile |
waitForResourceFilters | Boolean | Set to true if the planning board should wait for the default resource filters to be initialized |
profile | String | Choose the name of the profile to be loaded instead of the default - or standard, if there is no default - profile. |
Here is the query string in action: http://www.dimescheduler.com/?waitForResourceFilters=false&profile=My%20Profile. The application loads a profile named 'My Profile' and does not wait for the default resource filter to load before fetching the resources and appointments in the planning board.