Part 4: Processing appointments
This part closes the loop: when a task is (re)scheduled in Dime.Scheduler, you'll reach back to the underlying application (the Excel file) and update the task. You'll do this with the webhook connector and an HTTP-triggered Power Automate flow.
This is the fourth post in the guide on how to integrate Dime.Scheduler with Microsoft Excel through the Power Platform:
- Part 1: Setting up the connector
- Part 2: Resources
- Part 3: Tasks
- Part 4: Processing appointments
In this post, you will learn:
- How to post back to a Power Automate Flow
- Update the Excel file with appointment info
Step 1: What happens when you schedule an appointment
Unlike the standard connectors that Dime Software provides, your Power Platform solution does nothing by default when you modify an appointment on the planning board. If you want to act on appointment information, you build that behavior yourself.
That's where the webhook connector comes in. As soon as you change the planning, the webhook connector sends an HTTP POST request to your endpoint of choice with the entire appointment data graph. From the request body you can navigate the graph and pull out the details you need: who is assigned, when and where the work takes place, and more. For a complete overview of what's in the graph, see the API reference.
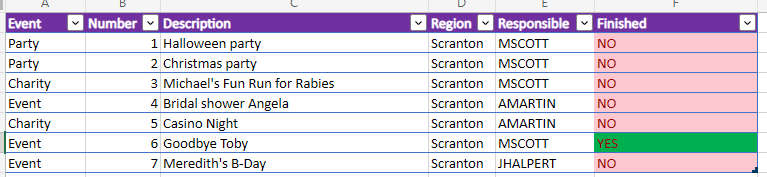
Since a Power Automate flow can be invoked with an HTTP request, that endpoint can be a flow of your own. In this example, the flow goes back to the Excel file on SharePoint and sets the 'Finished' status to true when a task has been scheduled:
Step 2: Create a flow
To keep this flow simple, make one small addition to the flow that creates tasks: add the Number column to one of the free text fields.

Run this flow again to update your tasks. Add the Task FreeText 1 column to the open task column list to confirm that the values from the Number column landed correctly in the free text property.
The postback uses this information to find and update the right row in Excel. Create another Power Automate flow, this time with a different trigger. Select "When a HTTP request is received" and paste the following JSON into the text area:
{
    "type": "object",
    "properties": {
        "Task": {
            "type": "object",
            "properties": {
                "FreeText1": {
                    "type": "string"
                }
            }
        }
    }
}
The Power Platform parses this JSON and generates variables you can use in later steps.
The JSON that is actually posted is much, much larger. We trimmed it here to keep the example focused. To see the entire data graph, use a network monitor or a testing tool such as webhook.site.
To return to the original Excel file and update the row of the scheduled appointment, select the 'Update a row' action and point it back to the original Excel sheet.
The Key Column and Key Value tell the Power Platform which column to use and which identifier to look for. Here, the Number field in the Excel sheet serves as the unique field. Scheduling an appointment sends Dime.Scheduler's entire appointment data graph, so you map the data once more, this time in the other direction (from Dime.Scheduler back to the Power Platform). Because you added the Number field to the task's FreeText1 field earlier in this step, the lookup is straightforward. To update this record, set the Finished column value to 'Yes'.
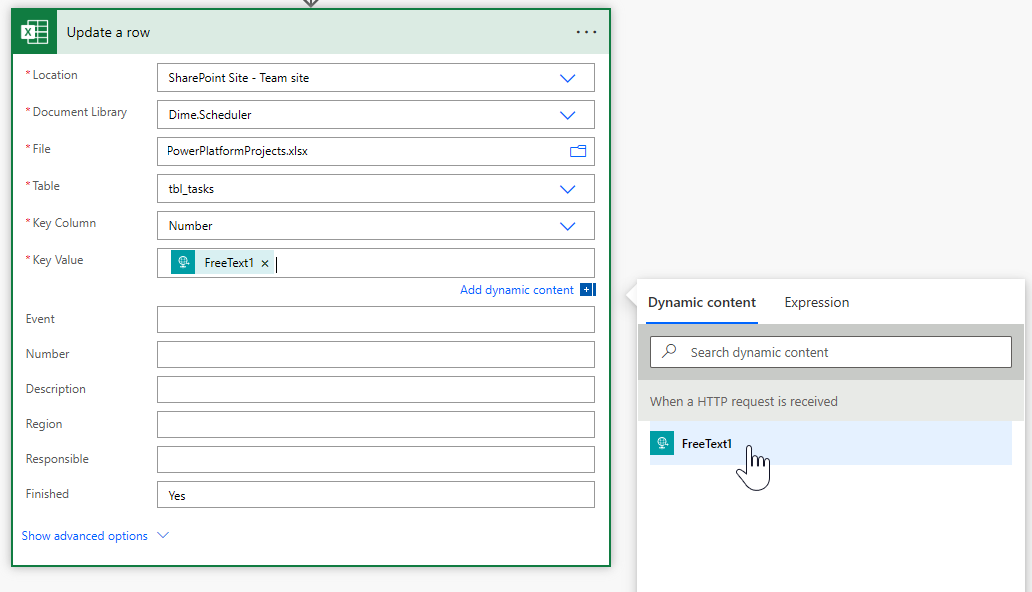
Save the flow and copy the value in the HTTP POST URL field of the HTTP trigger at the top of this flow.
Step 3: Set up the connector
When you schedule an appointment, Dime.Scheduler figures out which back-office system to notify. Recall that every flow specified a SourceApp value of 'SharePoint'. When such a task is scheduled, Dime.Scheduler looks for a connector with the same value.
On the connector setup page, make sure a record carries that value and a valid URI pointing to the back-office system. Here, you want to invoke the Power Automate flow you just created. Create a new record, specify the same source application as the jobs and tasks you created, tick the checkbox, select 'Webhook' as the back-office system, and paste the URL of the Power Automate flow trigger:

To test this connector, consider a testing site such as webhook.site, which also shows you all the fields and values that Dime.Scheduler publishes.
Step 4: Test
With the Power Automate flow and Dime.Scheduler connector in place, it's time to test. Pick any task, drop it on the planning board, and check the Power Automate flow history.

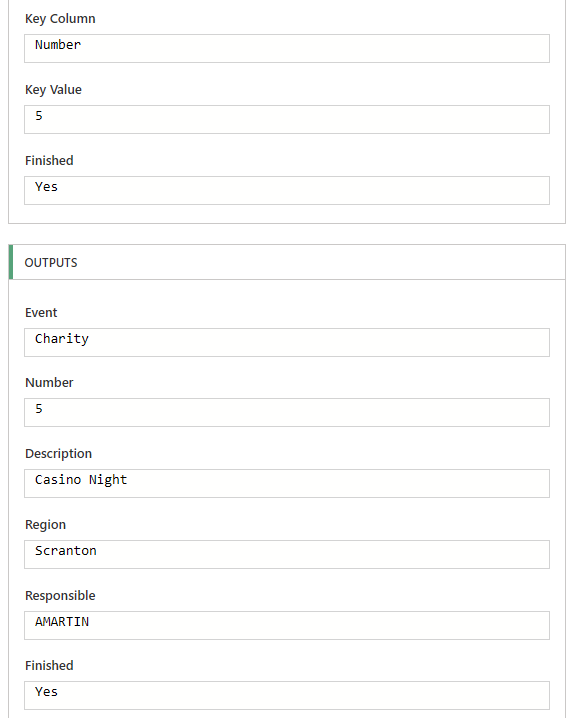
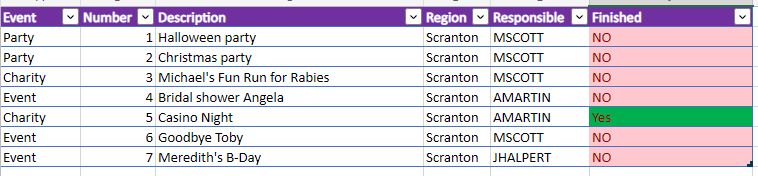
And sure enough, the flow has updated the correct row:
Congratulations: you now have a two-way message flow between Dime.Scheduler and the Power Platform. From here, the possibilities are wide open. The appointment graph carries all the details of the scheduled work, along with references to the original items, so you can build rich, powerful solutions on top of it.