HR
The Absence Registration FastTrack solution brings employee absences into your resource planning. Once you link employees to resources in NAV, you can plan their absences against those resources in Dime.Scheduler.
You can plan absences in three ways:
- Drag and drop an absence task onto the planning board in Dime.Scheduler.
- Enter an absence in NAV and send it to Dime.Scheduler as a planned task.
- Use the action shortcut (right-click on the planning board for the selected resource and date) to create an absence in NAV.
Configuring HR absence registration
In Dime.Scheduler you plan "tasks", and every task belongs to a "job". "Job" and "task" are generic names for whatever you want to schedule. To let users drag and drop absence tasks onto the planning board, you need a "job" and "tasks" in Dime.Scheduler. Absences have no header like a sales or assembly order, so the wizard creates a default "job" for you.
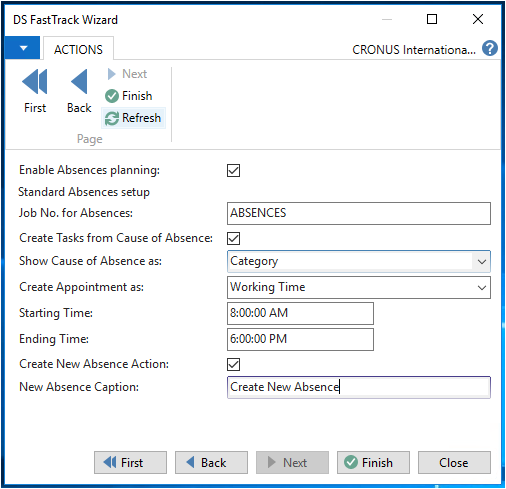
- Select "
Enable Absences planning" to turn on the solution. - Enter a descriptive code in "
Job No. for Absences". This code lets you sort, group and filter tasks in the open and planned Tasks grids in Dime.Scheduler. - Select "
Create Tasks from Cause of Absence" to create tasks in Dime.Scheduler based on the values in the cause of absence table. - To show the type of absence on a planned task in Dime.Scheduler, pick a value for "
Show Cause of Absence as":- Blank: no visual indicator.
- Category: the color of the planned task shows the cause of absence.
- Time marker: the time marker of the planned task shows the cause of absence.
When the user sends an absence from NAV or creates one with the action shortcut, "Create Appointment as" controls how the planned task appears in Dime.Scheduler:
- Working Time: the absence uses the start and end time set in "
Starting Time" and "Ending Time". - Full Day: the absence is created as a 24h planned task, and the "
Starting Time" and "Ending Time" fields are not used.
To let users create a new absence via the action shortcut, select "Create New Absence Action" and enter the caption shown to the user in Dime.Scheduler (see the screenshot below):
