Establishing a connection with Dime.Scheduler
The FastTrack Wizard walks you through every module and sets up the connection to Dime.Scheduler. Find it in the Departments menu:
Departments -> Dime.Studio -> Dime.Scheduler -> Connector
It's also on the action ribbon of the DS Setup page.
Establish the connection
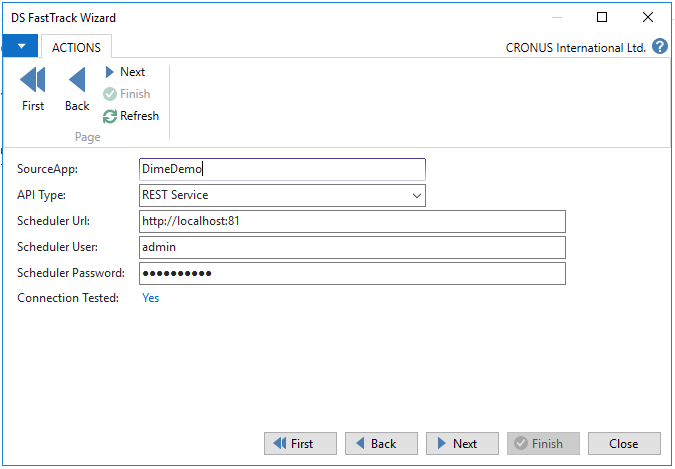
After the welcome screen, fill in the connection settings between NAV and Dime.Scheduler.
-
SourceApp: tags every record a NAV company sends to Dime.Scheduler, so Dime.Scheduler knows which company to send the planning back to. The wizard generates one from the company name; change it if you like. If several companies, databases, or applications connect to the same Dime.Scheduler installation, each needs its own unique SourceApp code.
-
API Type: select
REST Service. -
Scheduler Url: the Dime.Scheduler web service URL, the same for every company or application on this Dime.Scheduler installation:
Environment URI Production https://api.dimescheduler.comSandbox https://sandbox.api.dimescheduler.com -
Scheduler User: the user you'll connect with. It must exist in Dime.Scheduler and be a
Formsuser. Microsoft Entra ID users are not supported by the integration services. -
Scheduler Password: the password for that user.
-
Connection Tested: validate before continuing. Click
No(or Test Connection on the NAV Classic Client). On success it flips toYesand the Next button unlocks. On error, recheck the settings above, or ask whoever installed your Dime.Scheduler instance for the correct ones.
Modules
Pick what you want to plan:
Service orders
Jobs
Assembly orders
Production orders
Resources
Work centers
Machine centers
Sales orders
Absences
Use the FastTrack Wizard for the initial setup even if you'll add customizations later.