Filter Groups
A planner staring at a board of unassigned jobs needs to know more than who is free. They need to know who is qualified: which technician holds the certification this job demands, who speaks the customer's language, who is allowed to drive the van. Filter groups are how Dime.Scheduler answers that question. You use them to capture requirements on work items (qualifications, region, certifications, and so on) and the matching attributes on resources (a driver's license, languages spoken, and so on), then let the planner pair the two. Managing those groups and their values from Business Central is the most convenient way to set this up, because the data you need usually already lives in BC tables.
The 'Dime.Scheduler Filter Groups' setup is not limited to filter groups. The same configuration also defines categories, time markers and pins, the visual indicators on the planning board. Everything described below applies to those entities as well.
Whichever of these entities you create, the workflow is the same four steps: create the item, point it at a source, generate the available values (filter groups only), and send the record to Dime.Scheduler. That last step can be done by hand through a ribbon action, or left to run on its own through the scheduled job functionality on the 'Dime.Scheduler Setup' page.
Create the filter group
Open the Dime.Scheduler Filter Groups list in BC. Each row is one entity, defined by two fields:
| Field, tab or group | Description |
|---|---|
| Type | Specify whether this record represents a filter group, category, time marker and pin. |
| Group | The entity's name. This is also the name that is displayed in Dime.Scheduler. |
Specify the source for the filter values
Rather than typing values one by one, you tell Dime.Scheduler where to read them from. The source list lives in the ribbon under the ellipsis button, in the 'Related' submenu:
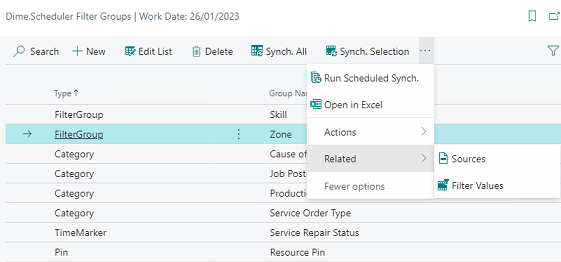
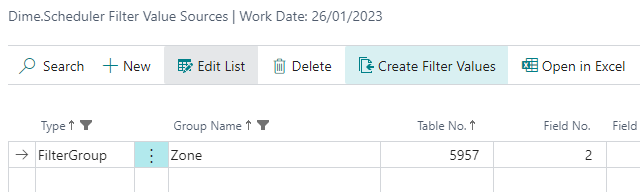
A source is a BC table and field, optionally narrowed by a filter:
| Field, tab or group | Description |
|---|---|
| Table No. | Specify the table number that is the source for the filter values |
| Field No. | Specify the field number of the field that contains the filter values. |
| Field Filter | Enter an optional filter to limit the available values (e.g. WHERE(Type=CONST(Resource),Skill Code=FILTER(DS))) |
Generate the available values
With the sources in place, let BC do the work: click the 'Create Filter Values' button and it reads the distinct values straight out of the source table. In the screenshot below, Dime.Scheduler generates filter values for the 'Zone' filter group based on the data in table 5957 (service zones).
If a value does not come from a table, you can also enter filter values manually.
Send the filter values to Dime.Scheduler
Open the 'Dime.Scheduler Filter Values' list in BC, then either select the entities you want to synchronize or select none to send them all.
You can mark certain filter values to be excluded from Dime.Scheduler. This is an alternative to the field filter in the filter values sources: instead of filtering at the source, you keep the value in BC but enable its Do Not Synch field so it never reaches the planning board.
Whether you are sending individual filter values or whole filter groups, the same two ribbon actions do the job: Actions -> Synch. All pushes everything, and Actions -> Synch. Selection pushes only the rows you highlighted. The selection action for filter groups is available from the filter groups page only.
To take this off your hands entirely, automate it. The supplied codeunit DS Scheduled Sync sends filter groups, categories and time markers to Dime.Scheduler without anyone clicking a button.
Use a job queue to run DS Scheduled Sync every night.
Standard connector
You do not always have to build this from scratch. The standard connector ships with the most common scenarios already wired up. Skills and zones, for instance, come out of the box in Business Central, with setup available in the FastTrack Wizard. Enable it, and the connector adds the filter groups and configures their sources so Dime.Scheduler uses resources' skills and zones to match the task requirements, no manual configuration required.
It is also the clearest illustration of what the filter group and values setup can do once you start defining your own.
For an even more flexible approach, consider using dimensions. The guide on using dimensions for filter groups walks you through the setup.