Use dimensions for filter groups
Use dimensions to give resources qualifications and tasks requirements, so Dime.Scheduler can match the right people to the right work. In this guide you build filter groups and values from Business Central dimensions, then assign them to tasks and resources to automate the matching process 1.
By the end, you will know how to:
- Create a filter group
- Link filter group values to dimensions in Business Central
- Assign dimension values as requirements and qualifications to tasks and resources
Prerequisites
This guide assumes you have already set up a dimension with at least one value.
Step 1: Create filter group
Group
Start by creating a filter group. In Business Central, hit ALT + Q and open the 'Dime.Scheduler Filter Groups' list. Create a new record of type 'FilterGroup' and enter a name. This example uses 'Department' as the filter group.

Step 2: Create filter values
Sources
With the new filter group record in place, go to the action bar of this list, click the ellipsis button, hover over the 'Related' submenu, and click 'Sources'. A filter group source is a reference to another table in Business Central. It dynamically creates filter values for this group from the data in the linked table(s).

Create a new record with the following properties:
- Table No.: 349
- Field No.: 3
- Field Filter: Where(Dimension Code=FILTER(
DEPARTMENT))
You may have to replace the value inside the filter to the right dimension code.
Table 349 is the dimension values table, and Field No. 3 is the Name field. In other words, this record uses the 'Department' dimension value names as the source for this group's filter values.

Filter Values
Finish the filter group configuration by creating the initial values. In the 'Dime.Scheduler Filter Value Sources' list, select the row you just created, go to the actions bar, and click 'Create Filter Values'. Every value that matches the criteria, that is, every value of the department dimension, is retrieved and creates a corresponding entry in the filter values list.

To check the result, return to the filter groups list, select the filter group, click the ellipsis button, go to 'Related', and click 'Filter Values'. The values of the department dimension appear here too.
This step creates the initial values list. Changes to the linked tables aren't synchronized or updated automatically, so rerun this step whenever you need to refresh the filter value list (and then synchronize with Dime.Scheduler).
Step 3: Link the filter group to resources and tasks
With the filter groups set up, assign them to resources and tasks. The table that handles the routing is 'Dime.Scheduler Doc. Filter Value Sources'.
For detailed information on Dime.Scheduler Document Filter Value Sources, continue reading here.
Resource
Open the 'Dime.Scheduler Doc. Filter Value Sources' table and select the line with table name 'Resource'. It should already be there if you ran the Dime.Scheduler FastTrack Wizard. Click 'Tables' in the actions menu.

In this table, add two extra sources to hook the Department dimension up to your resources. Each record is a child of the record above it.
| Link To Table No. | Link to Table Name | Method |
|---|---|---|
| 352 | Default Dimension | All |
| 349 | Dimension Value | Match |
When done correctly, you end up with the following hierarchy:
.
├── 156 - Match - Resource
│    ├── 352 - All - Default Dimension
│        ├── 349 - Match - Dimension Value
This graph shows that you navigate from the resource to the dimensions and then to the dimension values. For BC to do this, specify the fields, links, and filters for both records. Configure each by clicking the corresponding button in the ribbon.
To learn about fields, links, filters, conditions, and more, continue reading here.
Default Dimension
Links
As the docs explain, links are the field(s) that connect the selected table to its parent table. The 'Default Value' table sits under the 'Resource' table in the graph, so link it to that table:
| Link From | Link To | Field |
|---|---|---|
| 1 | 2 | Resource No |
Filters
As the docs explain, filters apply to the selected table to limit the number of records.
| Link to | Value | Comment |
|---|---|---|
| 1 (Table ID) | 156 | Table 156 refers to the resources table. |
| 3 (Dimension code) | DEPARTMENT | You may have to replace the value with the right dimension code. |
This data set means the filter applies only to resources that have the 'Department' dimension. In other words, resources without a department will not be returned in the set. After all, this is the default dimension.
Fields
No action required here as there are no fields to map.
Dimension Value
The regular dimension value works much the same way. Define the links and fields. Filters aren't necessary here, since the default dimension already provides a fallback.
Links
As the docs explain, links are the field(s) that connect the selected table to its parent table. The 'Dimension Value' table sits under the 'Default Dimension' table in the graph, so link it to that table.
| Link From | Link To | Field |
|---|---|---|
| 3 | 1 | Dimension code |
| 4 | 2 | Dimension value code |
Filters
No action required here.
Fields
As the docs explain, fields specify which fields are the source of a filter value.
| Filter Group | Field No |
|---|---|
| Department | 3 (Dimension Name) |
Task
The process is similar for tasks, but a task can originate from many different sources, such as a service order, a sales order, and more. Each module also lets you plan at different levels. For a sales order, for example, you could plan at the sales header level or create a task for each sales line. As a result, you may need to repeat this step for every table you want to schedule.
This example uses service items. In the 'Dime.Scheduler Doc. Filter Value Sources' table, make sure there is a line with the following specifications:
| Column | Value |
|---|---|
| Table no | 5901 |
| Table name | Service Item line |
| Entity type | Task |
| Resource Key Field No | 0 |
| Job Key Field No | 1 |
| Job Key Field Name | Document No |
| Task Key Field No | 2 |
| Task Key Field Name | Line No. |
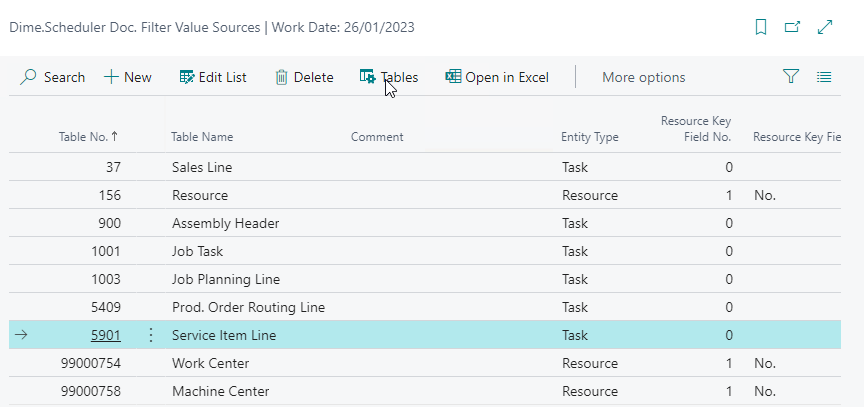
If you've enabled the service module in the Dime.Scheduler FastTrack Wizard, this record should already be there.
Once the record exists, go to the Tables and make sure there is a line for table 5901 that applies the method 'Match' and links to the Service Item Line table. Then select this record, click the Fields button in the ribbon, and add the following record:
- Filter Group: Department
- Field No.: 0
- Fixed Value: Service
- Fixed Value Behavior: Overrule
You may have to replace the value inside the filter to the right dimension code and value.
When you send a service order to Dime.Scheduler, it adds this extra requirement along with the order, and the filter button in the open task list becomes enabled. At least one filter is set: Department = Service
Do the same for a job task (table no. 1001) with the following field, and job tasks will carry a filter for Department = Job:
- Filter Group: Department
- Field No.: 0
- Fixed Value: Job
- Fixed Value Behavior: Overrule
Here is how it looks for a service order line:

Step 4: Synchronize
With the setup complete, send the groups, values, and assignments to Dime.Scheduler.
Filter Group
In Business Central, hit ALT + Q and open the 'Dime.Scheduler Setup' administration page. In the ribbon, click the 'Run Scheduled Synch.' button.
Resources
Send resources to Dime.Scheduler. If you use the standard 'Resources' table, the resource data is sent when you run 'Run Scheduled Synch' on the 'Dime.Scheduler Setup' page. Otherwise, send the resources to Dime.Scheduler through the functionality you built yourself.
Tasks
Send tasks to Dime.Scheduler. As you send each task, the setup configured in DS Doc. Filter Value Sources determines which filter values to include. You can send existing or new tasks. For existing tasks, this action is idempotent: filter values are added or updated in Dime.Scheduler.
Bonus: configure user security
You can use filter groups to set up data-driven user security in Dime.Scheduler.
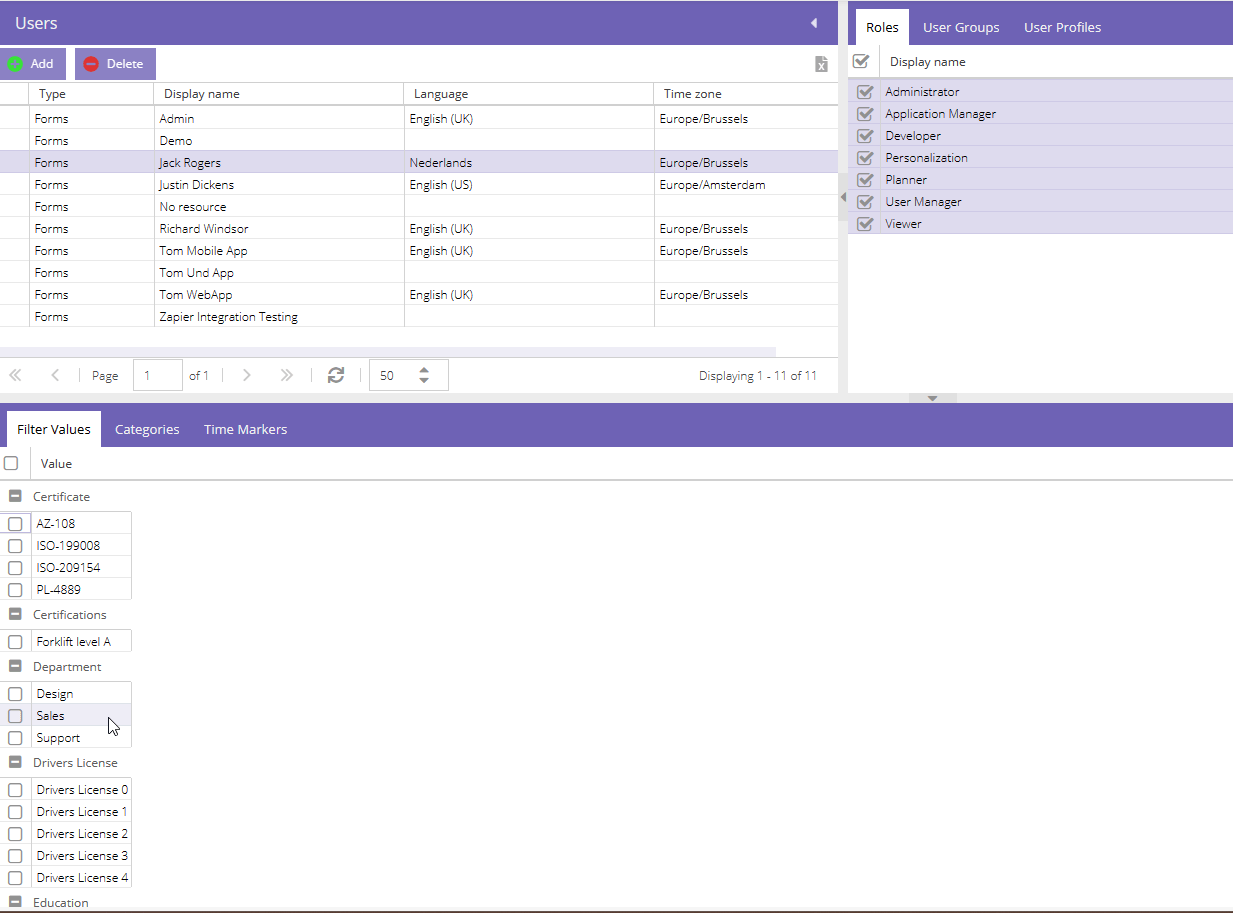
In Dime.Scheduler, go to > Users and select the user you want to apply a security rule to. In the pane at the bottom, find the filter group and check the values that apply to that user. From now on, the user sees only tasks and resources of the selected departments. Planned tasks stay visible on the planning board, but the user can't edit or delete them.
Read more
- Sales
- Production
- Service
- Sales
- Production
- Service
Start with a BC dimension
Pick a dimension that already classifies your business in Business Central - Department, Region, Team. Its values become the raw material for the matching rules in Dime.Scheduler.