Set up and test OAuth2
This guide is a continuation of the connector setup in Dime.Scheduler and its implementation in Business Central.
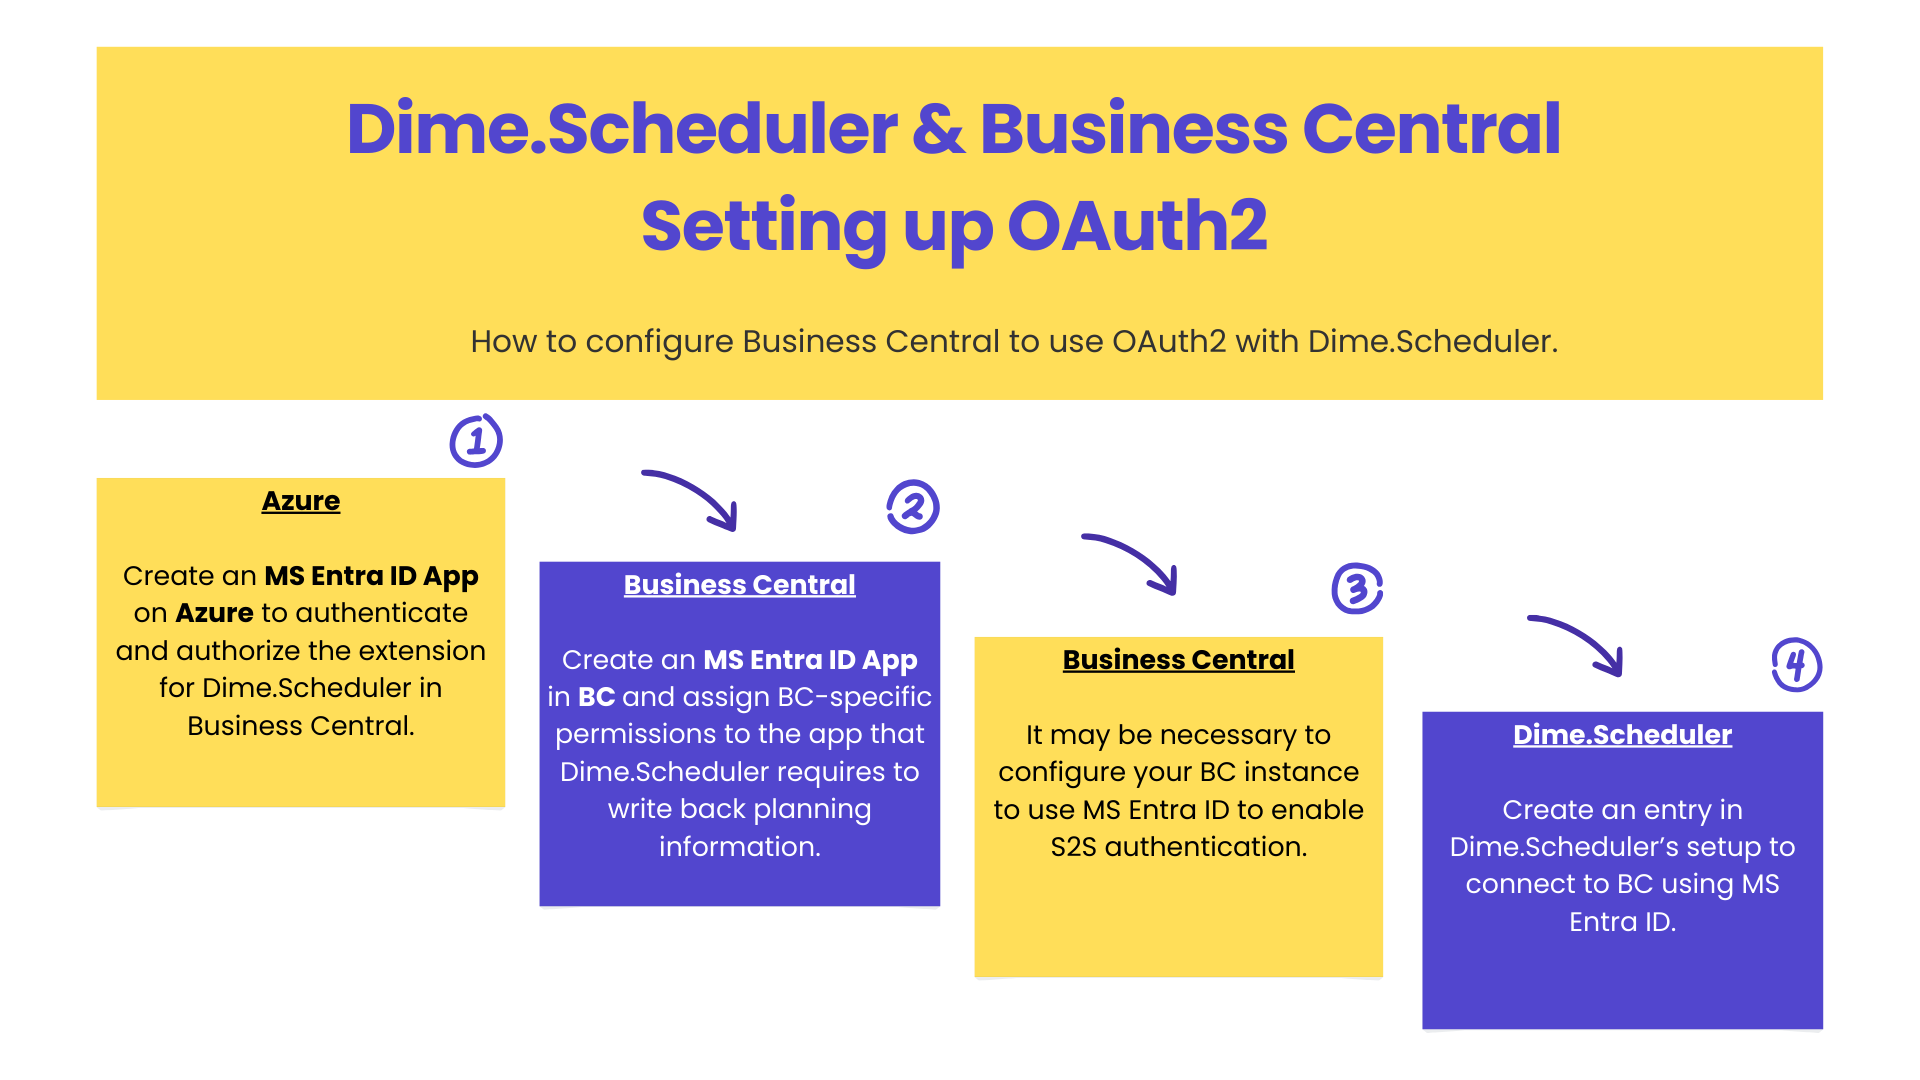
This guide walks you through setting up a BC test environment with OAuth2 enabled, so you can use these authentication and authorization flows with Dime.Scheduler. It covers four parts:
Prerequisites
-
Docker
We wrote this guide using Business Central on Docker (see the dedicated guide to start a new instance). Running an entire ERP system in a Docker container is convenient, but it introduces a few challenges that we call out throughout this guide.
Feel free to use your own internal testing environment instead.
-
ngrok
Because Business Central runs on Docker on our local machine, we need a way to expose the BC instance to Dime.Scheduler, which runs in the cloud. For that, we use a popular tunneling solution named ngrok. ngrok's free tier gives you one static domain.
If you already have DNS set up, you don't need ngrok.
-
Extension for Dime.Scheduler in Business Central
The extension for Dime.Scheduler in Business Central must be installed prior to registering the MS Entra ID app in Business Central.
Step 1: Create an MS Entra ID app on Azure
Create an MS Entra ID app on Azure with the following specifications:
- Name: Dime.Scheduler for MS Dynamics 365 Business Central
- Redirect URI:
https://{PublicWebBaseURL}/{INSTANCENAME}/OAuthLanding.htm - Permissions for Microsoft Dynamics 365 Business Central:
API.ReadWrite.Allapp_access
- Create a client secret and copy its value along with the client id and tenant id. We'll be using this information in the next steps.
The redirect URI must be reachable by Microsoft to complete the app registration consent. BC on your local Docker Desktop with an address like 'http://bc25/BC' is invalid (no SSL) and inaccessible (local). For this guide, create a one-time tunnel using ngrok for the web client.
For example, this command starts a static domain (use your own) and forwards it to our local BC25 on Docker:
ngrok http --domain=sleeping-dolphin.ngrok-free.app http://bc25
ngrok returns a lot of information, but the value you need is in the 'Forwarding' field. As long as you keep your terminal open, it forwards requests from https://sleeping-dolphin.ngrok-free.app to http://bc25:80.
Use your own free static domain that is assigned to your account on ngrok, and use the following template https://yourstaticngrokdomain.ngrok-free.app/{INSTANCENAME}/OAuthLanding.htm to populate the redirect URI field in the app registration.
Step 2: Register the MS Entra ID app in Business Central
In BC, create a matching record for the MS Entra ID app you just registered:
- Client ID: paste the client ID of the MS Entra ID app that you just created
- Description: Dime.Scheduler
- State: enabled
Select the following user permission sets:
- DIME DS ADMIN
- D365 BASIC ISV
Select 'Grant Consent' and approve the consent dialog.
When running BC on Docker, you should grant consent on the same domain that you specified in the redirect URI in the MS Entra ID app.
Instead of granting consent on 'http://bc25/BC', you must open the same page on 'https://yourstaticngrokdomain.ngrok-free.app/bc'. Failure to do so will result in an error, indicating that the 'http://bc25/BC' URI is not available in the redirect URI list.
Step 3: Enable S2S authentication using OAuth2 in BC
On-prem instances of BC need some tweaking to enable server-to-server (S2S) authentication. See the official documentation for more information.
This step is opinionated and illustrative: it gets you to a working solution. Proceed with caution if you're not using a Docker container.
The PowerShell script below runs in the BC PowerShell Prompt. We based it on this blog post and updated it for Business Central 25. Change the variable values, then run the script in the BC administration shell:
# Provide some basic info about your BC environment:
$BcBaseUrl = 'https://your_url_to_bc/'
$BCServerInstanceName = 'your_bc_instance'

# Provide the info about the MS Entra ID app that you created on Azure:

# 1. Application (client) ID
$ClientId = 'your_ms_entra_id_app_client_id'

# 2. Directory (tenant) ID
$TenantId = 'your_azure_tenant_id'

# 3. Application ID URI
$AppIdUri = 'your_ms_entra_id_app_id_uri'

# ---------------------------------------------
# NO MORE VARIABLES TO MODIFY BEYOND THIS POINT
# ---------------------------------------------

# Configuration for the WSFederationLoginEndpoint
$BCServerInstanceUrl = $BcBaseUrl + $BCServerInstanceName
$LandingUrl = $BCServerInstanceUrl + "/OAuthLanding.htm"
$WSFedEndpoint = "https://login.microsoftonline.com/$TenantId/wsfed?wa=wsignin1.0&wtrealm=$AppIdUri&wreply=$LandingUrl"

# Configure BC Server
$BCConfig = @{
    "PublicWebBaseURL"               = $BCServerInstanceUrl
    "ValidAudiences"                 = "$ClientId;https://api.businesscentral.dynamics.com"
    "ADOpenIdMetadataLocation"       = "https://login.microsoftonline.com/$TenantId/.well-known/openid-configuration"
    "ClientServicesCredentialType"   = "NavUserPassword"
    "WSFederationLoginEndpoint"      = $WSFedEndpoint
}

foreach ($key in $BCConfig.Keys) {
    Set-NAVServerConfiguration -ServerInstance $BCServerInstanceName -KeyName $key -KeyValue $BCConfig[$key]
}

# Configure web server
$WebConfig = @{
    "AadApplicationId" = $ClientId
    "AadAuthorityUri"  = "https://login.microsoftonline.com/$TenantId"
}

foreach ($key in $WebConfig.Keys) {
    Set-NAVWebServerInstanceConfiguration -WebServerInstance $BCServerInstanceName -KeyName $key -KeyValue $WebConfig[$key]
}

Restart-NAVServerInstance -ServerInstance $BCServerInstanceName
With this configuration in place, BC now supports S2S authentication.
Step 4: Create a connector entry in Dime.Scheduler
This step is standard Dime.Scheduler functionality, and is documented here.
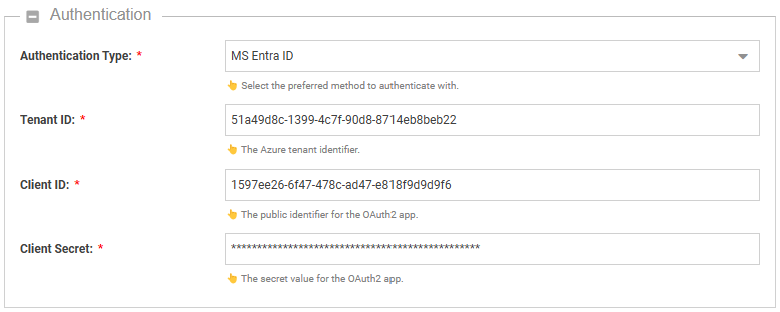
The last task is to create a connector in Dime.Scheduler. In the Authentication section of the form, fill out the following fields:
| Field | Value | How to find it in MS Entra ID |
|---|---|---|
| Authentication type | MS Entra ID | |
| Tenant ID | The Azure tenant ID | Field Directory (tenant) ID in the overview page of the app registration. |
| Client ID | The app registration's client ID | Field Application (client) ID in the overview page of the app registration. |
| Client Secret | The app registration's client secret | Create a secret in the 'Certificates and secrets' blade. Copy the secret Value field, not the client secret ID! |
Save the record. You've now set up the connector for Microsoft Dynamics 365 Business Central using OAuth2.
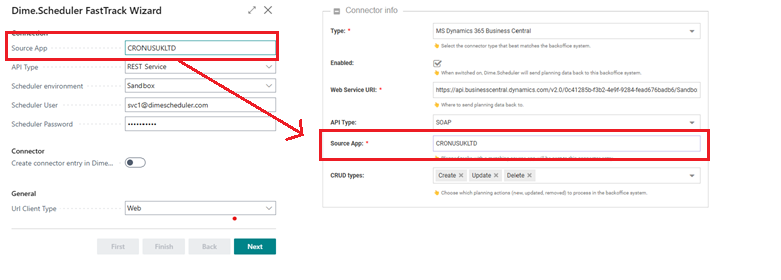
Don't forget to match the source app with the configuration in BC. The source app must be the same as the value that's specified in the Dime.Scheduler FastTrack Wizard in Business Central. The source app identifies which back-office system resources, tasks and appointments belong to.
Dime.Scheduler and Business Central are now able to communicate back and forth securely with OAuth2.
To test whether the OAuth2 authentication flow works, create a tunnel for the API (not the web client) if you're running BC locally on Docker.
For example, this command starts a static domain (use your own) and forwards it to our local BC25's API port on Docker:
ngrok http --domain=sleeping-dolphin.ngrok-free.app http://bc25:7048
Note how this time we target port 7048 rather than port 80. As a result, the API pages of Dime.Scheduler in BC will now be available publicly on https://YOURTUNNEL/BC/api/dimeSoftware/dimeScheduler/v1.0/companies(YOURCOMPANYID)/appointments.